Baked Chicken with potatoes & carrots

>> 6.02.2010

This simple yet scrumptious dish has all the look and flavor of a meal that was slaved over in the kitchen for hours, but in reality requires very little prep time and very few ingredients.  A couple other benefits of this nutritious meal include the "left-overs" factor (there are almost always enough for another meal), and the seasoned chicken bones provide a great start to homemade chicken stock.  This is also a great meal to make when having guests for dinner as it allows you to be visiting while the oven does all the work.  We eat at 5 o'clock in our home so I do my prep work at about 3:15 pm and have it in the oven by 3:30 pm~ that's all. =)

Ingredients:

  • 1 (3.5-4.5 lb) Whole Fryer Chicken (we prefer organic free-range)
  • 5 large organic Russet Potatoes, peeled and largely cubed
  • 7 organic Carrots, peeled and thickly sliced
  • All-purpose Seasoning (we use a homemade one but Jen using a great one from U.S. Wellness Meats)
  • Water for basting
Directions:
  1. Pre-heat your oven to 375°.
  2. After removing the gibblets, rinse the chicken with water and pat dry with a paper towel.  Heavily season all sides of the chicken and lay breast-side up in a large baking pan.  Secure the chicken legs together with kitchen twine (thread works fine too).
  3. Spread your potatoes and carrots around the chicken, sprinkle with the all-purpose seasoning and mix together.  Bake, uncovered, for 1¼ to 1½ hours (or until juices run clear), remembering to baste about every 15 minutes.  Enjoy!

This post is part of Pennywise Platter Thursday
 Photobucket

Read more...

Menu Plan Monday ~ Easy & Tasty Sides

>> 5.30.2010

While most of my prep work and time goes into my main dish, I've always appreciated a complimenting side dish.  It's difficult to find time to be creative with my sides so I stick mostly with a steamed veggie or a simple salad.  And as long as my main dish is bold enough in flavor, an easy side actually accompanies it quite nicely.  Almost all of our vegetables that we eat are out of our Abundant Harvest box which sometimes limits the variety of our sides but so far I've heard no complaints at our dinner table. =) 

Check back for recipe and picture links.  Have a great week!
  • Monday: Chicken Kebabs, grilled balsamic artichokes, green salad
  • Tuesday: Spaghetti, steamed sugar snap peas
  • Wednesday: Baked Whole Chicken, roasted potatoes & carrots, Lindsay's Caramel Corn for dessert
  • Thursday: Ground Beef Tacos, soaked black beans
  • Friday: Parmesan Chicken Tenders, basmati rice, green salad
  • Saturday: Chicken Salad sandwiches
  • Sunday: Out of Town

This post is part of Menu Plan Mondays
Photobucket

Read more...

Easy and Nutritious lunches for kids (fried rice)

>> 5.21.2010


Anne and I always talk about what we should be giving our kids for lunch. It is a meal that gets overlooked so often (at least in my house!) during the busy days. Yet, with a little effort, they can be nourished and can enjoy a good meal in the middle of the day. I have noticed a huge difference in my kids when they eat well for lunch during the "witching hour", that 4:00-5:00 time that they seem to be so difficult. They need good fats at lunch to replenish to be able to face the rest of their day. They also need to fill up so they don't drive you crazy begging for snacks all afternoon! Here is one I go to very often, not very different from my regular fried rice, just a little more kid friendly.
IMG_6532
Start with some leftover cold rice and coconut oil. I always use coconut oil for the kids, I think it is especially great for them! I try to find little ways to sneak it in and this is an easy one. Warm up a couple of Tablespoons and add the rice. Fry for about 5 minutes and add some peas. I add frozen organic peas straight from the freezer.
IMG_6533

Once the peas are cooked through, push the rice over and add a couple of eggs onto one side of your pan. Scramble them right in there.
IMG_6534
Lastly, incorporate it all together and you have a yummy nutritious lunch the kids will love in under 10 minutes.

IMG_6536
Do you have any great lunch ideas for kids? We would LOVE to hear them!


Read more...

Suzanne's Chicken

>> 5.19.2010


Last year, we had the opportunity to have an exchange student. She was from Cameroon and we learned so many things from her. It was an awesome experience that I would highly recommend! She taught me how to make one of her favorite chicken dishes. This has become a staple at our home, not only is it very yummy but it is easy to prepare and uses all fresh ingredients. (She said once while watching me use canned tomato sauce that no one from Africa trusts food that they can't see.) :) Here is what you'll need:

*2 boneless skinless chicken breasts cut into strips
*Olive Oil (enough to coat your pan)
*About 10 large tomatoes, quartered
*2 cloves of garlic, minced
*1 onion, chopped
*1/2 cup chopped parsley
*2 carrots cut into thin strips
*Seasoning of choice for the chicken (she used garlic salt and season all, but we prefer to use other things)
*Hot sauce
*Salt

(Unfortunately, she was a very good cook and just added "dashes" and seemed to cook by smell. It was fun to watch, but difficult to duplicate. Here is what I do, my husband claims he can't tell the difference.)

Begin by quartering your tomatoes and chopping your onion and throwing them both right into a medium sized pot. Turn the heat to medium and just cook them down, stirring occasionally. Season your chicken strips with your seasoning of choice. Fry them in the olive oil in a large pan and set aside. Cook the garlic in the remaining olive oil until fragrant. Add carrots and parsley and cook for a couple of minutes. By this time your tomatoes and onion should be cooked all the way down to a "sauce" texture. Pour the sauce into the pan and mix well. Add the chicken back in also. Season with salt and hot sauce to your liking and simmer on low until the carrots are cooked through. Serve with pasta or rice. I really like this dish with coconut rice and a green salad. Enjoy!

This post is part of Real Food Wednesdays at Kelly the Kitchen Kop


Read more...

Chicken Tetrazzini (& comparing pastas)

>> 5.18.2010

I have to admit that sometimes my taste buds miss our old way of cooking.  I'm sure this will go away eventually, especially as I continue to tweak my "old" recipes to make them more nutritious.  One thing in particular I miss is (not so much the taste of but the texture of) "regular" pasta.  I've tried sprouted pasta, which has a phenomenal whole-grain flavor but lacks the smooth consistency of white rice pasta.  Recommended from Kimi at The Nourishing Gourmet was the brown rice pasta from Trader Joes.  This is what I'm currently using (it is extremely frugal at only $1.99 for 16 oz.) and it has a smoother consistency then the sprouted and the taste is great, but my 3 little boys are not big fans. 

I have been wanting for some time now to try Tinkyada rice pasta (it contains no wheat, gluten, soy, egg, corn, dairy, casein, meat or nut).  Jen had ordered a big box of it from Amazon last week and kindly gave me a package to try out.  WOW!! I Loved it!! Everyone loved it!  We tried the white rice pasta (can't wait to try the brown rice next!) and both taste and texture was delightful.  The price is...well...worth it. =)  The real test is going to come tomorrow when I make my boys some buttered pasta for lunch but I have a hunch that all will be well.  I promise to update if there is any objections =)  Here is the recipe for the Chicken Tetrazzini I tried Tinkyada's pasta in:
  • 8 oz. Spaghetti
  • 2 cups cooked & chopped chicken
  • 8 oz. cremini mushrooms
  • 1/2 cup butter, separated
  • 1/4 cup flour (I use sprouted spelt)
  • 3/4 tsp sea salt
  • 1/4 tsp freshly ground pepper
  • 1 cup chicken stock
  • 1 cup heavy cream
  • 2 TBS cooking sherry
  • 1/2 cup grated Parmesan
  1. Preheat your oven to 350.  Lightly grease a 9x13 Pyrex pan.
  2. In a skillet, melt 1/4 cup butter (I use a little more) and saute mushrooms for 10-15 minutes.  Reserve the juices from the mushrooms.
  3. After you get your mushrooms going, start to cook your pasta to al dente (a more firm texture, usually 8-10 min); drain and set aside.
  4. Meanwhile, in a large saucepan melt 1/4 cup butter over medium heat.  Whisk in flour, salt and pepper until smooth.  Remove from heat and gradually stir in the chicken stock and cream. 
  5. Return to heat and bring to low boil for 1 minute, stirring constantly.  Add in the sherry and remove from heat.  Combine the chopped chicken, mushrooms and reserved juices and pasta with the cream sauce.  Pour into prepared baking dish and top with Parmesan cheese.  Bake 30 minutes, until bubbly and lightly browned.
I paired this with some sauteed sugar snap peas.  Enjoy =)


 Photobucket

Read more...

Coconut Rice

>> 5.14.2010


This is one of our favorite ways to make rice.  It is very mild and fragrant and compliments many other dishes.  I use the leftovers to make fried rice even more flavorful.  The kids love it! 

*2 cups rice ( I prefer white Jasmine, brown Basmati is pictured)
*1 TBS coconut oil
*10 oz coconut milk
*water
*cilantro to garnish

Start by rinsing your rice well and cooking off the excess water.  Add your coconut oil to the rice and cook until fragrant and rice begins to brown.  Add coconut milk and enough water to cover by about 1/2 inch.  Stir and let settle.  Bring to a boil and then turn the heat down and let simmer until cooked through.  (About 20 minutes.)  Turn the heat off and let rest about 5 minutes.  I love to garnish ours with cilantro, although we have also used toasted almonds and toasted coconut with great results.  

Enjoy!

This post is part of Pennywise Platter Thursday

Photobucket

Read more...

Tom Ka Gai (Coconut Chicken Soup)

>> 5.11.2010

It is no secret that I love soup.   It is very hard to beat potato leek soup, but I have to admit, I think this soup is my absolute favorite.  When I make this soup, my whole kitchen fills with exotic scents, the coconut and peanut butter alone smell unbelievable as they heat up together, and as each ingredient is incorporated, another layer of depth is added that makes this soup so special.  If you like Thai, you will love this soup!  It is quick and easy to prepare, but it will wow your guests.  

Tom Ka Gai

*1 TBS coconut oil
*1 TBS peanut butter
*3 cloves garlic, minced
*2 chopped lemon grass stalks
*2 tsp crushed red pepper
*1 tsp ground coriander
*1 tsp ground cumin
*1 skinless boneless free range chicken breast half, cut into thin strips
*1 Onion, sliced thinly
*3 cups chopped bok choy
*4 cups water
*10 oz coconut milk
*1/4 cup fish sauce*
*1/4 cup chopped fresh cilantro


This recipe is very easy to throw together if you prep all of your ingredients first.  There is not much time for all of the chopping between steps, so be prepared.  Start by chopping your garlic, lemon grass, bok choy, onion and cilantro, and have your chicken ready to go in thin strips as well.     


Combine the coconut oil and peanut butter in your pot and heat through.  Add your garlic, lemon grass, red pepper, coriander and cumin and cook until fragrant.  (About 2 minutes.)  Add your onion and chicken and cook until chicken is mostly done and onion is translucent.  (About 5 minutes.)  Stir in bok choy and cook until it begins to wilt.  (About 5 minutes.)  


Stir in water, coconut milk, fish sauce and cilantro.  Summer until  chicken is thoroughly cooked and the flavors are well blended.  (About 30 minutes.)


Garnish with some fresh carrot and cilantro.  The crisp cool carrot partners well with the spice in this soup.  I often serve it with coconut rice, and often add mushrooms during the first step.  

Enjoy!

*A word about fish sauce:  My first encounter with fish sauce was making this soup years ago.  I bought it, even though it seemed very suspicious.  When I opened it, I realized I was right to be leery of it.  It smells like what it sounds like: someone made sauce out of a fish.  Now, I'm not sure how it is made, it says that it is made with anchovies.  All I know is that is is oily and fishy.  Do not put it up to your nose.   However, I almost didn't put it in my soup that day and I am SO glad I resisted my wimpy impulse.  It MADE the soup.  Do not omit it, as scary as it is, it is probably the most important ingredient.  :)  In fact, I love the flavor so much that I use it in other things now also. Trust me, you will love it! 

*Also, I got this recipe from Allrecipes years ago and have slightly modified it.  I do want to give the original credit though!


Photobucket 

Read more...

Menu Plan Monday~ Busy Week

>> 5.03.2010

If the gorgeous weather isn't proof enough that winter is over then my calendar sure is.  As I was looking over our family's month of May I realized we have only 7 days that are appointment-free!  Between T-Ball starting and end-of-the-school-year activities we are going to be on the move!  This makes it difficult at times to find time to cook, which inevitably means more eating out.  And that's just not an option right now~ so what to do?

For starters, when making my meal plan this week I was careful to include several chicken dishes.  Chicken is so versatile and easy it just made sense that that is where our protein will be coming from this week.  So yesterday my husband marinated and grilled up 4 whole chicken breasts.  The main part of our weekly meals is fully cooked and ready, and then I just tried to come up with a menu that was diversified enough and not boring.  Here's what I came up with:

  • Monday: Grilled Chicken, roasted sweet potatoes, green salad
  • Tuesday: Chicken Fried Rice w/ sugar snap peas
  • Wednesday: Chicken, brown rice pasta & roasted veggies in cream sauce
  • Thursday: Grass-fed Ground beef tacos
  • Friday:  Out to dinner
  • Saturday: Chicken Pot Pie
  • Sunday: Breakfast for Dinner~ Soaked blueberry coffee cake
Enjoy the week!

This post is part of Menu Plan Monday.
 Photobucket

Read more...

Ham & Potato Soup

>> 4.27.2010

Last Wednesday, in the middle of our gorgeous 80 degree week, we had a wet and cold day.  The weather came out of nowhere, although I am convinced the Lord, in His sovereignty, gave me this day because I had planned on making my ham & potato soup.  Well, He may not have given this weather just for me, but I praise Him for it just the same.  My parents came over just as we had finished our soup, and I witnessed my mom return to the pot again and again for another little taste.  She must have said "Oh, this is very good" at least 10 times, which, coming from a woman who's food is raved about up and down California (by those fortunate enough to have tried some) just made my heart smile.  I love that we share a love of cooking, and I love that my cooking skills don't embarrass her. =)
For those of you who are still entrenched in winter, here's a recipe worth making while the weather permits.  And please, if anyone else's mom drops by unexpected on the night you make this, you have to let me know if she too fills your home with Ooos and Awws. =)
Ingredients:
  • 3 large russet potatoes, peeled and diced into 1 inch squares
  • 3 TBS olive oil
  • 1/2 cup onion, diced
  • 1/2 cup carrots, diced
  • 1/2 cup celery, diced
  • 3/4 to 1 cup ham steak, diced
  • 4 cups chicken broth
  • 3/4 tsp celtic sea salt
  • 1 tsp black pepper
  • 5 TBS butter
  • 5 TBS flour (I use sprouted spelt)
  • 2 cups whole raw milk
  • cheddar cheese, opt.  
Prepare your ingredients.  This is probably as time-consuming as cooking the soup, so make sure you give yourself plenty of time.  This is a great recipe to let your kids help you with~ I gave my 6 year old a butter knife and he diced my ham, carrots and celery.
In a large saucepan or dutch oven, saute your onion in the olive oil, about 3-4 minutes.  Add in the carrots, celery and ham and cook another 3-4 minutes, stirring often, until the ham starts to slightly brown.
 Next, add in the wine and deglaze your pan, then incorporate the potatoes, cooking another 5 minutes or so.  If you'ld like, after the onions are sauted you could add in the other ingredients at once and cook for a few minutes, or even wait and add it all with the chicken broth.  I add in stages to bring out the flavor in each ingredient separately.  
 Add in your chicken broth, sea salt and pepper and bring to a boil.  Turn the heat to low and simmer for about 15 minutes.
Meanwhile, in a saucepan melt butter on med-high heat.  Whisk in flour to make a rue~ make sure to whisk quickly and until there you have a smooth paste. 

Slowly pour the milk into the rue, whisking continuously.  After incorporated, cook on med-high heat for 5 minutes until the sauce has thickened, then add it to the soup and stir well.  For a chunkier soup, take a potato-masher and mash soup several times.  For a creamier version use a immersion blender.
Top with some shredded cheddar cheese and pair it with a slice of spelt buttermilk bread, and enjoy!


This post is part of Real Food Wednesday at Kelly the Kitchen Kop
Photobucket
Posted by Picasa

Read more...

Sweet Potato Fries

Ingredients:

  • 4-5 medium organic sweet potatoes, peeled and cut into strips
  • olive oil, just enough to lightly coat the potato strips
  • 1 1/2 TBS celtic sea salt, or to taste
Pre-heat your oven to 425 degrees.  Peel your sweet potatoes and slice them into french fries. 
 
Place the fries in a ziploc baggy and lightly coat with olive oil.  Add salt and shake. 

Place the fries in a single layer on cookie sheets.  Bake about 25 minutes, turning just once, until golden and crispy.  Serve promptly, with a little extra sea salt sprinkled on top.

Photobucket
Posted by Picasa

Read more...

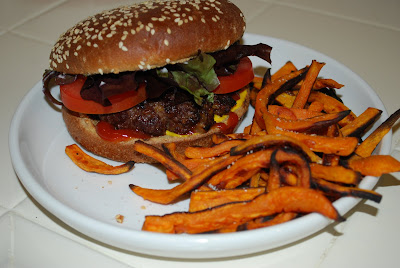
Grass-Fed Beef Burgers

With springtime pretty much in full bloom in Southern California we have been enjoying the smells of BBQ around our neighborhood and taking advantage of our outdoor patio set for dinner.  These are precious times around here because pretty soon, all too soon, the blistering heat will be upon us.  There's really only 4 glorious months where we live: April, May, October and November.  The rest of them are plagued with windy and miserable cold or scourching and unbearable heat.  I'm kind of being dramatic here~ at least about the cold.  But not about the heat~ it is unbearable.  Anyway, we too have been BBQing a little more along with the rest of the town.  Here's a rendition of one of our favorite grilled hamburgers that I think you'll enjoy.  Happy Spring!
Ingredients:

  • 1 lb. grass-fed ground beef (we buy from Organic Pastures)

  • 1/2 cup onion, diced

  • 2 garlic cloves, minced

  • 2 TBS tamari (fermented soy sauce)

  • 1/4 cup gorganzola cheese, opt.

  • 1 tsp. pepper

  • 1 tsp celtic sea salt

  • Condiments of choice
Turn your grill on to medium, around 400°.  Place your ground beef in a bowl and add in the gorganzola, pepper and sea salt.  Set aside.
In a medium skilled heat up the tamari and saute your onions and garlic in it, about 4 minutes.  Let cool slightly, then incorporate into the ground beef.
 
Separate the ground beef into four equal sections, then roll into a ball.  Flatten with the palms of your hand into patties about 3/4 inch thick.  Then make a depression in the middle of each with your thumb to keep the patties from balling up when they cook.
 
Grill for 3-4 minutes per side, until about medium (or to your liking).  At this point you could add some extra gorganzola on the top of each patty if you'ld like.
Lastly, just add on your favorite condiments (I highly recommend grilled onions), pair with some sweet potato fries and enjoy!
This post is part of Real Food Wednesday
Photobucket
Posted by Picasa

Read more...

Fresh Chamomile Tea

>> 4.25.2010

When my husband came home with our Abundant Harvest box this week, I never thought it would be such a learning experience for me.  As soon as I walked by it and smelled the sweet scent, I was taken back to my childhood in an instant.  Have you ever had that happen to you?  I couldn't remember the exact time, but that scent was so familiar, and one that I had not enjoyed for so long.  It was chamomile. 


I immediately grabbed my very helpful abundant harvest newsletter, which usually contains tips and recipes for unfamiliar produce.  (I am constantly surprised by how many unfamiliar produce items I encounter.)  All it gave was a small snippet about the stress relieving powers of chamomile, and a recipe for chamomile tea.  I was intrigued, because I have never enjoyed store bought chamomile tea.  It has an unpleasant flavor and smell, and really doesn't deliver what it says it will.  From my box: "DID YOU KNOW? An single cup of  (trademarked brand) tea has been known to have the same effect as sitting for 45 minutes in a mountain meadow on a sunny day with your shoes off."  Really?  As a mother of 5 I rarely get a chance to sit in a sunny meadow with my shoes off for an uninterrupted 45 minutes.  As that would probably rank in my top 3 things to do with my spare time, I had high hopes for my boxed chamomile tea.  However, it was more like taking medicine~ just drink it as fast as possible in hopes that it will at least deliver on the stress relieving properties and not leave as strange an aftertaste as I think it probably will.  Disappointed again.  Not that I expect a cup of tea to take away all of the stress from my day, that is what the word of God is for.  Still, it would be nice to know that they are somewhat accountable to what they say on the package.  I know, I know:  too high of standards.  Well, I did a little digging and found out that chamomile does in fact have many uses.  It may not deliver in the very small proportions(and probably somewhat altered states) you find at the grocery store, but it does, historically, have a record of doing a lot of good. 

If you google chamomile, you will find all sorts of wonderful things that it can be used for.  I will not try to cover all of the medicinal purposes here, but I would encourage you to look into it, it is well worth your time! Just a little teaser for you: chamomile is used medicinally to treat sore stomach, irritable bowel syndrome, and as a gentle sleep aid. It is also used as a mild laxative and is anti-inflammatory and bactericidal.  Source  If you do get your hands on some fresh chamomile, it would be well worth looking into all of the other things you could do with it, besides tea.   Although I have to say that the tea I made with the fresh flowers was exceptional, and something that I am going to start doing a lot more often.  Here is the tea recipe that I used, I hope you enjoy it as much as I did!

Things You'll Need:

*chamomile flowers

*a tea pot

*water

*strainer

*a tea cup

Pick the amount of flowers you will need to make your tea and wash thoroughly.  Discard the stems, only use the actual flowers.  (You will need approximately 1 TBS flowers for ever cup of tea.)

Bring the water to a boil.  After the water is boiling, add the flowers and turn off the heat.  Let steep for about 15 minutes.

When your tea is finished, strain the flowers out with a mesh strainer and add honey or lemon if desired.  Enjoy with a good book.  (TIP: wrap the flowers you have strained into some cloth and use on burns, bruises, or insect bites)  Source   I've also learned that chamomile can make a mean, muscle relaxing, stress relieving bath.  I'm excited to try that next! 


Photobucket

Read more...

Followers

  © Free Blogger Templates Autumn Leaves by Ourblogtemplates.com 2008

Back to TOP