Ham & Potato Soup

>> 4.27.2010

Last Wednesday, in the middle of our gorgeous 80 degree week, we had a wet and cold day.  The weather came out of nowhere, although I am convinced the Lord, in His sovereignty, gave me this day because I had planned on making my ham & potato soup.  Well, He may not have given this weather just for me, but I praise Him for it just the same.  My parents came over just as we had finished our soup, and I witnessed my mom return to the pot again and again for another little taste.  She must have said "Oh, this is very good" at least 10 times, which, coming from a woman who's food is raved about up and down California (by those fortunate enough to have tried some) just made my heart smile.  I love that we share a love of cooking, and I love that my cooking skills don't embarrass her. =)
For those of you who are still entrenched in winter, here's a recipe worth making while the weather permits.  And please, if anyone else's mom drops by unexpected on the night you make this, you have to let me know if she too fills your home with Ooos and Awws. =)
Ingredients:
  • 3 large russet potatoes, peeled and diced into 1 inch squares
  • 3 TBS olive oil
  • 1/2 cup onion, diced
  • 1/2 cup carrots, diced
  • 1/2 cup celery, diced
  • 3/4 to 1 cup ham steak, diced
  • 4 cups chicken broth
  • 3/4 tsp celtic sea salt
  • 1 tsp black pepper
  • 5 TBS butter
  • 5 TBS flour (I use sprouted spelt)
  • 2 cups whole raw milk
  • cheddar cheese, opt.  
Prepare your ingredients.  This is probably as time-consuming as cooking the soup, so make sure you give yourself plenty of time.  This is a great recipe to let your kids help you with~ I gave my 6 year old a butter knife and he diced my ham, carrots and celery.
In a large saucepan or dutch oven, saute your onion in the olive oil, about 3-4 minutes.  Add in the carrots, celery and ham and cook another 3-4 minutes, stirring often, until the ham starts to slightly brown.
 Next, add in the wine and deglaze your pan, then incorporate the potatoes, cooking another 5 minutes or so.  If you'ld like, after the onions are sauted you could add in the other ingredients at once and cook for a few minutes, or even wait and add it all with the chicken broth.  I add in stages to bring out the flavor in each ingredient separately.  
 Add in your chicken broth, sea salt and pepper and bring to a boil.  Turn the heat to low and simmer for about 15 minutes.
Meanwhile, in a saucepan melt butter on med-high heat.  Whisk in flour to make a rue~ make sure to whisk quickly and until there you have a smooth paste. 

Slowly pour the milk into the rue, whisking continuously.  After incorporated, cook on med-high heat for 5 minutes until the sauce has thickened, then add it to the soup and stir well.  For a chunkier soup, take a potato-masher and mash soup several times.  For a creamier version use a immersion blender.
Top with some shredded cheddar cheese and pair it with a slice of spelt buttermilk bread, and enjoy!


This post is part of Real Food Wednesday at Kelly the Kitchen Kop
Photobucket
Posted by Picasa

Read more...

Sweet Potato Fries

Ingredients:

  • 4-5 medium organic sweet potatoes, peeled and cut into strips
  • olive oil, just enough to lightly coat the potato strips
  • 1 1/2 TBS celtic sea salt, or to taste
Pre-heat your oven to 425 degrees.  Peel your sweet potatoes and slice them into french fries. 
 
Place the fries in a ziploc baggy and lightly coat with olive oil.  Add salt and shake. 

Place the fries in a single layer on cookie sheets.  Bake about 25 minutes, turning just once, until golden and crispy.  Serve promptly, with a little extra sea salt sprinkled on top.

Photobucket
Posted by Picasa

Read more...

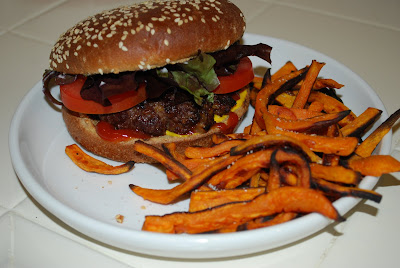
Grass-Fed Beef Burgers

With springtime pretty much in full bloom in Southern California we have been enjoying the smells of BBQ around our neighborhood and taking advantage of our outdoor patio set for dinner.  These are precious times around here because pretty soon, all too soon, the blistering heat will be upon us.  There's really only 4 glorious months where we live: April, May, October and November.  The rest of them are plagued with windy and miserable cold or scourching and unbearable heat.  I'm kind of being dramatic here~ at least about the cold.  But not about the heat~ it is unbearable.  Anyway, we too have been BBQing a little more along with the rest of the town.  Here's a rendition of one of our favorite grilled hamburgers that I think you'll enjoy.  Happy Spring!
Ingredients:

  • 1 lb. grass-fed ground beef (we buy from Organic Pastures)

  • 1/2 cup onion, diced

  • 2 garlic cloves, minced

  • 2 TBS tamari (fermented soy sauce)

  • 1/4 cup gorganzola cheese, opt.

  • 1 tsp. pepper

  • 1 tsp celtic sea salt

  • Condiments of choice
Turn your grill on to medium, around 400°.  Place your ground beef in a bowl and add in the gorganzola, pepper and sea salt.  Set aside.
In a medium skilled heat up the tamari and saute your onions and garlic in it, about 4 minutes.  Let cool slightly, then incorporate into the ground beef.
 
Separate the ground beef into four equal sections, then roll into a ball.  Flatten with the palms of your hand into patties about 3/4 inch thick.  Then make a depression in the middle of each with your thumb to keep the patties from balling up when they cook.
 
Grill for 3-4 minutes per side, until about medium (or to your liking).  At this point you could add some extra gorganzola on the top of each patty if you'ld like.
Lastly, just add on your favorite condiments (I highly recommend grilled onions), pair with some sweet potato fries and enjoy!
This post is part of Real Food Wednesday
Photobucket
Posted by Picasa

Read more...

Fresh Chamomile Tea

>> 4.25.2010

When my husband came home with our Abundant Harvest box this week, I never thought it would be such a learning experience for me.  As soon as I walked by it and smelled the sweet scent, I was taken back to my childhood in an instant.  Have you ever had that happen to you?  I couldn't remember the exact time, but that scent was so familiar, and one that I had not enjoyed for so long.  It was chamomile. 


I immediately grabbed my very helpful abundant harvest newsletter, which usually contains tips and recipes for unfamiliar produce.  (I am constantly surprised by how many unfamiliar produce items I encounter.)  All it gave was a small snippet about the stress relieving powers of chamomile, and a recipe for chamomile tea.  I was intrigued, because I have never enjoyed store bought chamomile tea.  It has an unpleasant flavor and smell, and really doesn't deliver what it says it will.  From my box: "DID YOU KNOW? An single cup of  (trademarked brand) tea has been known to have the same effect as sitting for 45 minutes in a mountain meadow on a sunny day with your shoes off."  Really?  As a mother of 5 I rarely get a chance to sit in a sunny meadow with my shoes off for an uninterrupted 45 minutes.  As that would probably rank in my top 3 things to do with my spare time, I had high hopes for my boxed chamomile tea.  However, it was more like taking medicine~ just drink it as fast as possible in hopes that it will at least deliver on the stress relieving properties and not leave as strange an aftertaste as I think it probably will.  Disappointed again.  Not that I expect a cup of tea to take away all of the stress from my day, that is what the word of God is for.  Still, it would be nice to know that they are somewhat accountable to what they say on the package.  I know, I know:  too high of standards.  Well, I did a little digging and found out that chamomile does in fact have many uses.  It may not deliver in the very small proportions(and probably somewhat altered states) you find at the grocery store, but it does, historically, have a record of doing a lot of good. 

If you google chamomile, you will find all sorts of wonderful things that it can be used for.  I will not try to cover all of the medicinal purposes here, but I would encourage you to look into it, it is well worth your time! Just a little teaser for you: chamomile is used medicinally to treat sore stomach, irritable bowel syndrome, and as a gentle sleep aid. It is also used as a mild laxative and is anti-inflammatory and bactericidal.  Source  If you do get your hands on some fresh chamomile, it would be well worth looking into all of the other things you could do with it, besides tea.   Although I have to say that the tea I made with the fresh flowers was exceptional, and something that I am going to start doing a lot more often.  Here is the tea recipe that I used, I hope you enjoy it as much as I did!

Things You'll Need:

*chamomile flowers

*a tea pot

*water

*strainer

*a tea cup

Pick the amount of flowers you will need to make your tea and wash thoroughly.  Discard the stems, only use the actual flowers.  (You will need approximately 1 TBS flowers for ever cup of tea.)

Bring the water to a boil.  After the water is boiling, add the flowers and turn off the heat.  Let steep for about 15 minutes.

When your tea is finished, strain the flowers out with a mesh strainer and add honey or lemon if desired.  Enjoy with a good book.  (TIP: wrap the flowers you have strained into some cloth and use on burns, bruises, or insect bites)  Source   I've also learned that chamomile can make a mean, muscle relaxing, stress relieving bath.  I'm excited to try that next! 


Photobucket

Read more...

Asparagus Risotto

>> 4.19.2010


This warm and creamy traditional Italian side dish was made from a mix of fresh asparagus from my Abundant Harvest box and arborio rice.  I must admit that, while my husband and I love risotto of all kinds, my children are not crazy about this dish.  They love rice in general, just not "the slippery kind".  What can I say~ I have little boys. =)
  • 1 lb. fresh asparagus, cut into 1 inch pieces
  • 3 cups homemade chicken broth*
  • 2 cups water*
  • 1 cup Arborio rice
  • 1/2 onion, diced (or shallots)
  • 3 garlic cloves, minced
  • 1/2 - 3/4 cup white wine
  • 1/2 cup heavy cream
  • 1/2 cup freshly grated parmesan cheese
  • Butter or Olive Oil for sautéing
  • Celtic Sea Salt and Pepper, to taste*
*As to the chicken broth and water, you may use all chicken broth, as I did, just make sure to not add any salt.  The flavor will be very, very rich (which we prefer) if you do not cut it with the water.

  1.  In a saucepan combine the chicken broth and water and heat on med-high until simmering.  Reduce heat to low and keep warm.
  2. In a large skillet cook the asparagus in about 3 TBS butter until tender-crisp.  Remove the asparagus and keep warm.
  3. In the same skillet sauté the onion and garlic for about 3 minutes in your choice of fat.  Add the rice and cook another 2 minutes.  Add in the wine, deglazing the pan with it until most-to-all of the liquid has evaporated. 
  4. Increase the heat to a med-high and add in 1 cup of the broth-water mixture.  Cook, stirring frequently, until the liquid has been absorbed.  Continue stirring and adding 1 cup of the liquid at a time, allowing each cup to be absorbed before adding the next.  This should take between 25 and 30 minutes, until the rice is tender and the texture is creamy.
  5. Stir in the asparagus, cream, salt, pepper and parmesan cheese and simmer another 2 or 3 minutes.  Serve immediately. 
I paired this with grilled chicken and a salad for dinner, although it is more than filling to enjoy as a meal of its own!  

Photobucket

Read more...

Menu Plan Monday - Simple Week

I'm keeping it easy with my meals this week, mostly classics and only one new recipe (out of this months edition of Sunset Magazine).  I do have to make one note about Saturday's meal~ this is one of the easiest, most flavorful meals, plus it gives you lots of leftovers.  Don't forget to save the chicken bones along with any left-over chicken to make a yummy soup.  And don't forget to check back daily as I will be posting the recipes each day I make them =)  Have a great week everyone!

Here's what's on the menu this week:
  • Monday: Grilled Chicken, asparagus risotto and a green salad
  • Tuesday: Grass-fed ground beef burgers and sweet potato fries
  • Wednesday: Ham & Potato Soup, steamed broccoli
  • Thursday: Lime-Soaked Chicken Tacos (the Sunset Mag Recipe) and grilled balsamic artichokes
  • Friday: Left-over Buffett
  • Saturday: Roasted Whole Chicken w/potatoes, carrots & leeks, and a green salad
  • Sunday: Breakast for dinner~ Eggs, bacon, fresh hashbrowns and toast
This post is part of Menu Plan Monday at Organizing Junkie
Photobucket

Read more...

Creamy Chicken and Wild Rice Soup

>> 4.14.2010

Even though it is spring time, even in California we have had cool enough weather to extend soup season.  This makes me happy.  :)  I love soup, and this is one of my favorites!  Comforting, creamy, flavorful and nourishing.  I hope you enjoy it! 

* 4 cups free range chicken broth
* 2 cups water
* 2 cups leftover free range chicken meat, shredded
* 1 cup cooked wild rice
* 1 TBS all purpose seasoning of choice.  (I prefer the one from US Wellness Meats)
* 1/2 teaspoon celtic grey sea salt
* 1/2 teaspoon ground black pepper
* 3/4 cup all-purpose, unbleached flour
* 1/2 cup butter
* 2 cups heavy cream (I use whole raw milk)
* Vegetables of choice (optional)


Combine broth, water and chicken in a large stock pot.  If you do not have leftover chicken, start raw chicken in the broth and water and simmer all afternoon until falling apart.  Shred chicken and add vegetables.  Cook until veggies are tender.  Add rice and simmer until heated through. (Add water as needed to replace what evaporates.)


In a small bowl, combine salt, pepper and flour. In a saucepan over medium heat, melt butter. Stir in  seasoning of choice until bubbly. Reduce heat to low, then stir in flour mixture by tablespoons, to form a roux. Whisk in cream, a little at a time, until fully incorporated and smooth. Cook until thickened, 5 minutes.


Stir cream mixture into broth mixture. Cook over medium heat until heated through, 10 to 15 minutes.   Enjoy!

This post is part of Pennywise Platter at the Nourishing Gourmet.


Photobucket

Read more...

Oh For the Love of Chicken Pot Pie

>> 4.13.2010

Need a way for your kiddos to eat a ton of veggies?  Throw them in this pot pie!  This recipe was adapted from one on Allrecipes.com but of course I've changed things up a bit.  TIP: use a deep dish pie plate if you have one.  I currently do not have one (gave mine away- why would I do that?) so I just use my normal pie plate which works fine, just be sure to set the pie plate on a cookie sheet to catch any overflow.  There is a little bit of prep to this i.e. making the pie crusts, chopping veggies, but nothing too extensive.  The results are well worth it~ is there anything better than nourishing with a comfort food? ;)  Without further ado...

Ingredients:

  • Pie Crust from Cheeseslave (this is AMAZING! I use sprouted spelt)
  • 1 lb. Free-range organic chicken breast, cut into 1 inch cubes
  • 2 1/2 cups organic veggies, sliced
  • 1/3 cup onion
  • 1/3 cup butter
  • 1/3 cup flour (again, I use spelt)
  • 1 1/2 tsp. salt
  • 1 tsp. pepper
  • 1 tsp garlic powder
  • 2 1/2 cups organic Free-range chicken broth
  • 1 cup raw whole milk
Directions:
  1. Make your pie crusts in advance and refridgerate for at least 30 minutes.  Remove one, roll it out and place it in a pie pan.  Roll out the top crust and set aside.  There is no need to prebake the pie shell.
  2. Preheat oven to 425°.
  3. In a saucepan, combine chicken, veggies and broth.  Cover and boil for 15 minutes.  Remove from heat, drain~ save the broth, and set aside.
  4. In the saucepan over medium heat, cook the onions in butter until they are soft, about 3 minutes.  Stir in flour, salt, pepper and garlic powder.  Slowly stir in the saved chicken broth, and milk.  Simmer over medium heat until thick.  This should take almost exactly 5 minutes.
  5. Place the chicken and veggies on bottom pie crust.  Pour the hot broth mixture over the chicken and veggies and cover with top crust, sealing edges.  Cut away excess dough and make several small slits in the top to allow steam to escape.
  6. Bake in the preheated oven for 30 to 35 minutes, or until the top crust is golden brown.  Cool for 10 minutes before serving.
 Enjoy!

The post is part of Real Food Wednesday
Photobucket

Read more...

Meal Plan Monday~ Mixing Traditional & Simple Recipes

>> 4.11.2010


I am so blessed to have a great cook for a mother.  She was born in Italy and migrated to the US when she was thirteen, but not before she mastered some serious skill in the kitchen, taught to her by her mother and grandmothers, one of which had a dirt floor and only an open fire in the middle of her kitchen to cook on.  I love watching mom cook, but to record one of her recipes is almost impossible~ she doesn't measure anything!  She grabs handfuls of flour without touching a measuring cup and she shakes salt in until it "looks about right".  I have been able, though, to scribble down instructions for two of my favorite meals that she makes~ her meat sauce and her meatball recipe.  They are both amazing. 

The problem I run into is the traditional recipes like these always take so much time in the kitchen.  With 3 little boys to look after and a home to keep tidy, it's hard to find time for them, especially when I don't plan.  I have been working on mixing my favorite traditional recipes, or even new recipes that require more then 30 minutes of prep/cook time, with my simple recipes, i.e. grilled chicken, buttered pasta, etc.  I carefully look over my family's weekly schedule as I plan my menu to see what afternoons/evenings are lighter and will therefore allow me more time in the kitchen.  The planning is well worth it.  There are not quite as many "oohs" and "aahs" coming from the dinner table when I serve buttered pasta as there are when spaghetti sauce is served.  So don't shy away from the more involved meals, especially if you love to cook (as I do) but have busy families~ a little planning goes a long way. 

Here's what's on the menu this week:
  • Monday: Grilled Chicken, asparagus, grape bunches
  • Tuesday: "Nonna Emma's" Meatballs
  • Wednesday: Creamy Pasta w/roasted spring veggies
  • Thursday: Baked Chicken Strips w/ Balsamic dipping sauce, mashed potatoes, salad
  • Friday: Spaghetti sauce, salad, spelt-buttermilk bread
  • Saturday: Leftovers Night
  • Sunday: Breakfast for Dinner: Egg scramble, toast, sliced apples

This post is part of Menu Plan Monday at I'm an Organizing Junkie
Photobucket

Read more...

Frugal Yet Delicious~ Buttery Breadcrumb Chicken

>> 4.07.2010

I love when my meals are a success with my kids.  Our three boys, ages 6, 4 and 3 are pretty good eaters to begin with, but when my middle son says "MMMM! I love it, mom!" after he tries a bite of his dinner, my heart warms up instantly!  As I do my weekly meal planning I rummage through my pantry and make my meals according to what I've got stocked.  Bread, of course, is something I always have on hand as I'm sure most of you do.  A few months ago I was making dinner and in need of my breadcrumbs from Trader Joes but, of course, I was all out.  So I tried to make my own.  Success!  Why in the world have I ever been buying breadcrumbs?!  It's so easy to make them and they taste so much better (as do most homemade food items).  I love using them in my chicken parmesan, but for a frugal and less timely alternative for a breaded baked chicken, try this recipe for Buttery Breadcrumb Chicken:
  • 1 lb. Free-range, organic, boneless & skinless chicken breast (about 1 whole breast)
  • 1 cup homemade bread crumbs
  • 1 TBS celtic grey sea salt
  • 1/2 tsp freshly ground pepper
  • 1 TBS garlic salt
  • 1 pastured egg, beaten
  • 1/2 cup butter, cut into pieces
For the breadcrumbs, preheat your oven to 500°.  Toast 3 slices of bread to a medium-brown.  Let cool about 5 minutes.  Break up into small pieces in a food processor and pulse until about pea-sized.
Spread breadcrumbs evenly out onto a cookie sheet.  Bake about 4 minutes, stirring once.  Keep a close eye on the breadcrumbs~ they can burn pretty quickly.
After they come out of the oven, put them back into your food processor and pulse again until nice and fine, or desired consistency.  Ta-Da!

For the chicken, lower the oven temp to 375°.  Place eggs and breadcrumbs in two seperate shallow bowls.  Season breadcrumbs with sea salt, garlic salt and pepper.  Dip chicken in eggs, the dredge in the crumbs.  Arrange in an 8x8 baking dish.  Top chicken with cut-up pieces of butter. 

Bake 30-35 minutes or until chicken is no longer pink and the juices run clear.  I paired this meal with buttered brown-rice pasta and some kiwis and strawberries from our garden.

This post is part of Pennywise Platter Thursday at The Nourishing Gourmet
Photobucket

Read more...

Rustic Apple Tart

>> 4.06.2010

Anne and I (and our families) love apple pie!  It was funny, because we actually talked about our apple pie recipes, (we each had a special recipe that we made a lot and loved) and one day I made the pie for a get-together and we realized that we had the same recipe. :)  This was way before we started to use real food, and I knew that we needed to adapt our favorite recipe to suit our new way of life.  Here is my outcome.  :)
I started with the pie crust from Cheeseslave.  I used sprouted flour, it was good (actually great!) just not quite right for a sweet pie.  I would recommend using this recipe with unbleached white flour as Ann Marie did, or else using the sprouted flour for a savory dish, like a pot pie or quiche. 
Next, the apples.  Peel, cut and core enough apples to fill your desired dish.  I used a tart pan, although I usually use a pie plate.  I think I used 5 apples.  Now, the kind of apple you use is just a preference thing.  I definitely prefer tart apples for pies, like granny smiths.  Anne would argue that sweet apples (like galas or fujis) are the way to go.  It is up to you. 
The first thing you want to do is mix your crust according to the directions. Roll out on a floured surface and form to your plate.  I par-baked mine for about 5 minutes at 425.
Notice the chunks of butter and lard, these are essential for a flaky crust.  I had never done it this way  before, but decided that is was worth the effort!
The next step is to fill your pie with the apples, and form the lattice top of your pie.  This dough made with sprouted flour was a little more difficult to work with, but doable. 
Now for the sweet stuff.  You will need 1/2 cup of butter, 3 TBS flour, 1/4 cup water, 1 cup of sucanat and 1 TBS honey.  Melt the butter in a saucepan. Stir in flour to form a paste. Add water and sucanat and bring to a boil. Reduce temperature and let simmer.
                                   
Next, pour over the top of your pie slowly, letting it fill the pie evenly. 
Bake your pie at 425 for 15 minutes, then reduce the temperature to 350 for another 35 to 45 minutes.  Let stand until it reaches room temperature.
Enjoy!


Photobucket

Read more...

Followers

  © Free Blogger Templates Autumn Leaves by Ourblogtemplates.com 2008

Back to TOP